Push-ups are one of the foundational calisthenics exercises and, along with dips, they’ll be one of your main tools for training the pushing pattern and the muscles involved in it.
Some people, even as beginners, can already do a few push-ups when they start training, so they don’t need much help there. But it’s also very common for people to be unable to do even one full push-up and need to work toward it.
The good thing about calisthenics is that there are progressions starting from absolute zero. You can build strength gradually and, in a relatively short time, work your way toward your first push-ups. So in this article, we’re going to look at those progressions and a simple routine to help you get your first push-up.
Why many people can’t do push-ups when they start
Usually, when someone starts calisthenics and can’t do a single push-up, it’s because they haven’t had much experience with sports in general or training in particular.
In very common sports like soccer, basketball, volleyball, and others, physical preparation often includes exercises like push-ups.
Also, anyone who has spent time in a gym or joined general fitness classes has usually done some kind of pushing strength work, so they’re often able to do at least one push-up.
Whether it’s because they never had that background or because they’ve been inactive for a very long time, some people may not be able to do even one push-up. And that’s not a problem, as we’ll see below.
What muscles do push-ups work?
Push-ups are a pushing exercise where you press the floor away while keeping your body solid from shoulders to feet. Even though they seem chest-focused, they actually combine several muscles working together to move and stabilize your body.
Chest: this is the main driver of the movement. Your chest helps push your body upward and bring your arms toward your torso. If you want to improve your push-ups, building chest strength will give you more pressing power.
Triceps: these extend your elbows on the way up. You’ll especially notice their role at the end of each rep, when you finish the press. If you tend to get stuck halfway up, they probably need more work.
Shoulders: the front of the shoulders is especially involved and helps stabilize your arm position. Strong shoulders make the movement more solid and controlled.
Core: your abs, lower back, and deep trunk muscles keep your body aligned. They’re not pushing the floor, but they stop your hips from sagging or your body from losing tension. If your body “breaks” during push-ups, this is a clear area to strengthen.
Progressions to get your first push-up
The key to getting your first full push-up on the floor is to start with easier progressions where you can work in a rep range of about 6 to 15 repetitions.
These progressions will help you build strength so you can move from the easiest variation to the next one in the chain and, little by little, reach the final goal through steady progress.
As you’ll see, the main variable in these progressions is the height of your hands. The higher your hands are, the easier the exercise becomes. Then you gradually lower that height until you reach the floor.
Let’s go through them from easiest to hardest so you know the path you should follow.
Wall push-ups
Start standing in front of a wall, with your hands placed at chest height and slightly wider than shoulder-width. Step back a little so your body is slightly inclined, and keep a stable line from head to feet. From there, bend your elbows to move toward the wall, then press back in a controlled way without collapsing into the movement. This is the best option for complete beginners who have never trained or have almost no upper-body strength.
In this variation, you won’t be able to use a full range of motion because your forehead will reach the wall first, but that partial range still helps you start building strength.
Incline push-ups: level 0
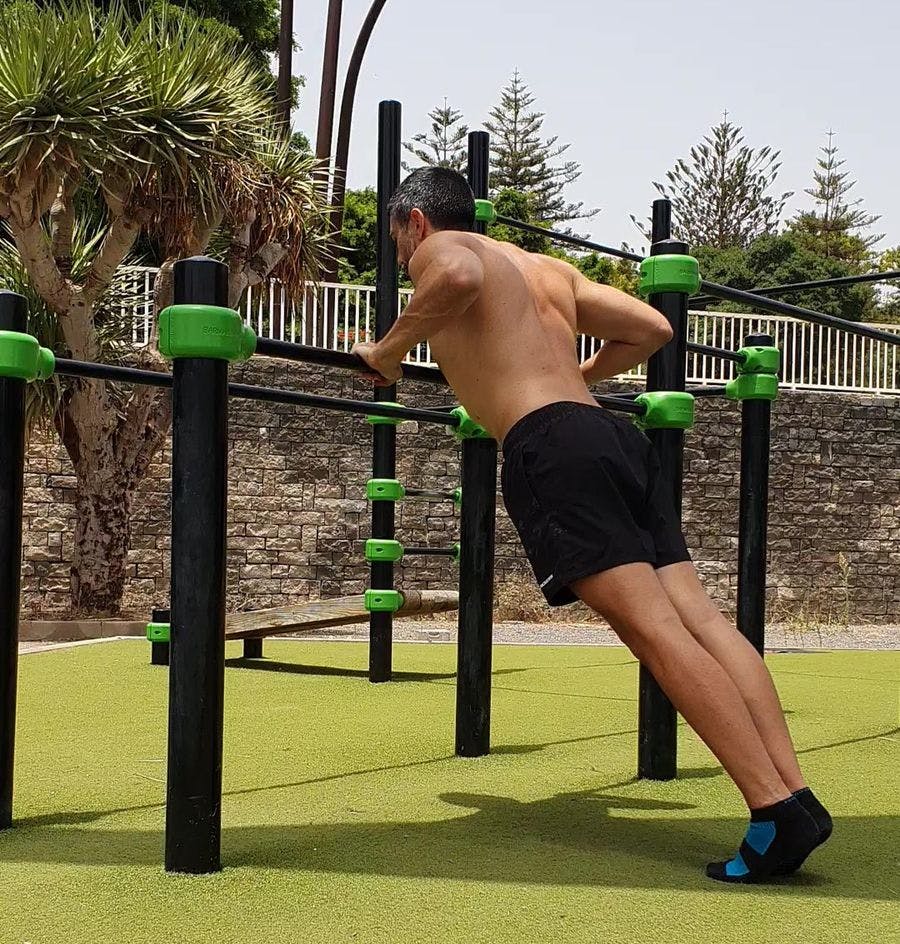
In this variation, you place your hands on an elevated surface roughly around stomach height. This could be a bar set at that height, a table, or a box placed vertically. The higher the surface, the easier the exercise, which makes this a very useful way to adjust beginner push-ups to your actual level and start accumulating reps with good technique.
From this point on, you can start working through a full range of motion, bringing your chest down toward your hands and bending your elbows past 90 degrees.
Incline push-ups
Once you control the previous level, you can lower the support and do them with your hands on a surface around knee or thigh height. For example, a bar at that height, a chair, a bench, or a box. The movement now looks much more like a regular floor push-up, but it’s still a more accessible option for building strength without losing movement quality.
Knee push-ups
This is one of the most common progressions, and it’s still very useful when done properly. Place your knees on the floor, keep a stable line from your shoulders to your knees, and avoid arching your back. Lower yourself under control, bringing your chest toward the floor, then press back up without losing body position.
Negative push-ups
Here, the focus is on lowering slowly and getting the most out of the eccentric phase of the exercise. Get into a push-up position, lower yourself slowly to the floor, and once you’re down, place your knees on the ground to help yourself back up. These are very effective for building strength and are often a key part of push-up progressions when you still can’t complete the way up normally.
Partial range push-ups on the floor
At this stage, you’re already working on the floor, but without demanding the full range of motion yet. Start with a very short range, even if you only lower yourself a few centimeters, and gradually increase that range until you reach the full movement. In the meantime, you can keep working on the earlier progressions as well to accumulate more volume and build the strength you still need.
Full push-up
The starting position is with your hands on the floor at a width that feels stable for you, arms extended, and body aligned. From there, lower yourself under control until your chest gets close to the floor, then press back up while keeping your core active and your posture solid, without letting your lower back sag. If you want to learn how to do a push-up, this is the end goal, but you’ll get there faster if you respect the process and don’t skip levels.
Proper push-up technique
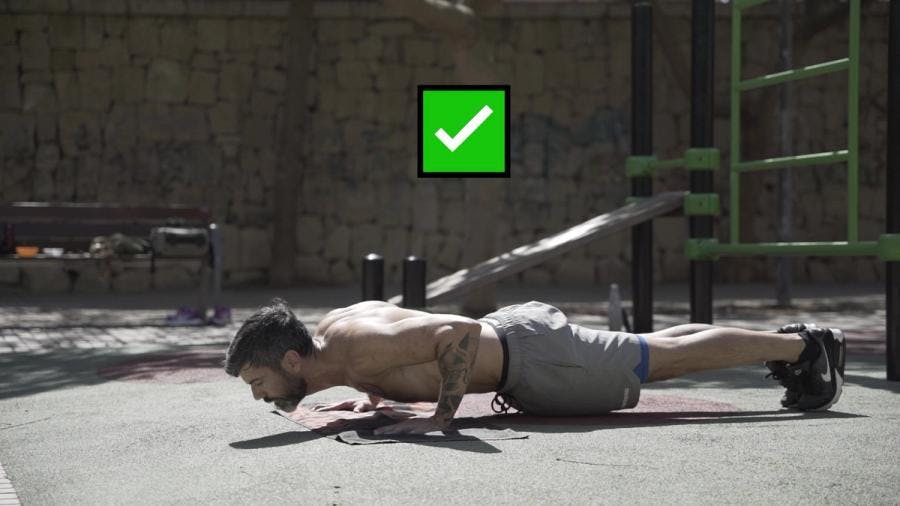
To do a push-up correctly, start by placing your hands slightly wider than shoulder-width apart and your feet together or almost together. From there, think about creating a straight line from your head to your heels. Your body should stay aligned the entire time.
Brace your core so your hips don’t sag and don’t stay too high either. The idea is for your hips to stay in line with your back and legs, as if your whole body were one single block. On the way down, your chest shouldn’t drop first and your hips shouldn’t lag behind. Everything goes down together, under control.
Also pay attention to your elbows. You don’t want them flaring too far out, but you don’t want them tucked too tightly into your body either. A middle ground usually works best: around 45 degrees relative to your torso. That position usually helps you press more stably and distribute the effort better.
Taking care of your technique is not a minor detail. It helps you transfer force better through the muscles involved, reduces the risk of discomfort or injury, and builds a more solid foundation for real strength gains.
A very useful tip is to film yourself from different angles, especially from the side and from the front, so you can spot small mistakes you may not notice while you’re actually doing the exercise.
Common mistakes when trying to get your first push-up
Letting your elbows flare too much or tucking them too much. Both options usually make the position less stable and the press more awkward or inefficient.
Letting your hips sag or keeping them high while only your upper body goes down. In a proper push-up, one part of the body doesn’t move separately. Your whole body should move as one block.
Not going low enough. If you shorten the range too much, the work is incomplete and progress becomes harder.
Doing reps too fast, using bounces or momentum. Rushing usually makes technique worse. Fewer reps done well and under control is the better choice.
How many reps should you do to make progress?
A simple and practical way to progress is to stay with each progression until you can do 3–4 sets of 6–12 reps with good technique. Once you can do that consistently, it makes sense to move on to a slightly harder variation.
You don’t need to train it every day. For most beginners, 2–3 times per week is a good frequency to improve without building up too much fatigue. What matters is not doing a huge amount all at once, but repeating the work often enough to adapt and keep moving forward.
How long does it take to get your first push-up?
There’s no exact timeline because it depends on several factors: your starting strength, how consistently you train, your body weight, and your training frequency. Even so, in many cases it’s possible to get your first push-up in around 2 to 6 weeks if you train regularly and follow an appropriate progression.
If it takes longer, that doesn’t mean you’re doing it wrong. It only means your starting point and your pace are different.
How to unlock other exercises
If you need help getting your first pull-up, you’ll find everything you need in this article.
If what you want is to get your first dip, which can be a great next step after your first push-up, you can find that here.
And if you want a complete beginner-friendly guide to calisthenics, take a look here.
Conclusion
Anyone can learn how to do push-ups, but it usually doesn’t happen overnight. The key is to progress step by step, take care of your technique, and train consistently.
If you want to start with a clear structure, in Calisteniapp you’ll find programs designed to help you start from zero and progress in the basic calisthenics exercises.
By Yerai Alonso