Calorie Deficit: What It Is and How to Calculate It If You Train Calisthenics
Discover what a calorie deficit is, how to calculate it based on your activity level, and how to apply it if you train calisthenics to lose fat without losing muscle.

As the pull-up is one of the basic, iconic, and representative exercises of Calisthenics, it is natural for people entering this discipline to want to "master" them.
The problem is that people who do not have a training history in other disciplines or basic strength often find they cannot perform even a single repetition and, therefore, their first goal is to achieve their very first pull-up. In this article, we are going to explain how to fulfill that goal of the first pull-up.
We will begin with simple progressions from level 0, for people who have absolutely no strength or have never exercised before, and we will advance little by little until achieving the highly prized pull-up.

The pull-up is a vertical pulling exercise in which we have to lift almost our entire body weight (relative strength). Therefore, it is not a simple exercise, and it is normal that many people cannot perform even one repetition. As the main factors explaining why this exercise is so resistant to the majority of the population, we have the following:

This exercise works a large number of upper body muscles, whether for the main movement of shoulder extension and elbow flexion, or secondarily for the grip, to stabilize and maintain body posture.

Main muscles worked in pull-ups:
Secondary muscles:
Muscles that receive residual work for stabilization and posture:
If you want to see what other exercises work the biceps in calisthenics, we recommend our article on the subject. And if you want to see how to work the back specifically, we have this other article.
We are going to try to explain the progressions practically from level 0, so there is really no strict requirement to start. It would be convenient if you can hold yourself hanging from the bar for at least 10 to 20" and if you can do a controlled Australian pull-up on a high bar. If you do not meet these requirements, do not worry; below we will explain how to work at your level until you achieve them.
Australian pull-ups are key for people who do not yet have the strength to do exercises on a high bar. Furthermore, they have the great advantage that, by adjusting the height of the bar itself, you can increase or decrease their difficulty until you find the progression suitable for your level. The higher the bar is, reaching at most chest height, the easier the exercise will be.

The Australian pull-up consists of placing your body under the bar while keeping your feet supported on the ground. You can place your legs completely extended or flexed, whichever is more comfortable for you. Then flex your arms while keeping your back aligned with your thighs, without the hips dropping or rising above that level. Reach the bar with your chest and extend your arms again to complete one repetition.
As you get stronger, you can gradually lower the height of the bar until you can do them with the bar at thigh height. To do these variations, you have different options:
We recommend training them with both a prone grip (palms facing forward) and a supine grip (palms facing your face). If you need a more detailed explanation of this exercise, you have it in our article on Australian pull-ups.
Goal to achieve: sets of 12 - 15 repetitions without a problem.

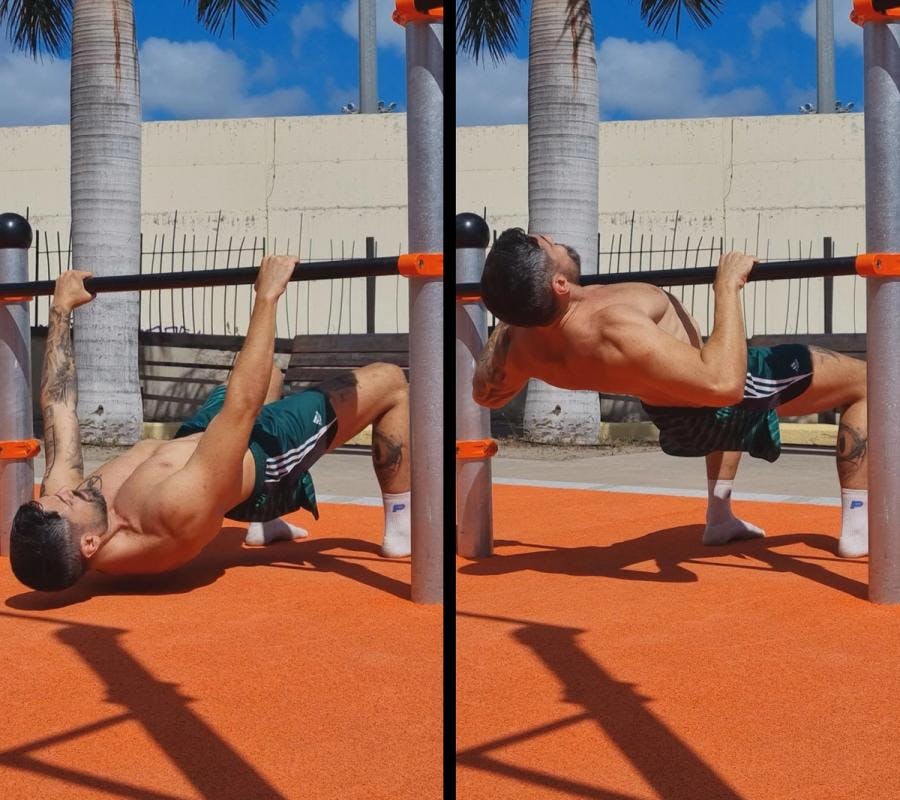
Once you have some strength in Australian pull-ups, you can begin to do an isometric hold in a supine grip, holding for time at the top with your chin above the bar. Place something to help you get up or jump to the bar and maintain the isometric hold.
The supine grip is the one where your palms are facing your face. It usually tends to be easier to start with for the first progressions. Monitor how long you are able to hold and try to gradually increase it until you are able to hold for at least about 20" before moving to the next progression.
Goal to achieve: 20 - 25" isometric hold.

A complementary exercise that will be very useful when you have to make full pull-up attempts is scapular retractions. Start hanging completely and, without flexing your elbows, try to bring your shoulder blades together, performing the retraction. Think about trying to stick your chest out and retracting the upper part of your back. I recommend practicing this exercise in both prone and supine grips. Goal to achieve: 10 - 12 consecutive scapular retractions.

Once you can hold at the top without much trouble, you can do partial range repetitions. Start by making them very short, with very little range of motion, so that you gain strength and comfort with the exercise; over time, you can increase the range and the number of repetitions. Goal to achieve: 8 - 10 short repetitions.

A key point in your progress towards the pull-up will be when you can already do repetitions to the midpoint of the range. Starting from the top with a jump, lower yourself until your arms form a 90º angle and pull back up. If you manage to increase the repetitions until you can do about 5, you will be very close to achieving your first pull-up. Goal to achieve: 3 - 5 half-way repetitions.
One of the best ways to gain strength is to use eccentric or negative repetitions. Start by jumping to place yourself in the isometric position with your chin above the bar and descend as slowly and controlled as you can. Try to achieve at least 3 or 4 seconds of descent and increase the number of repetitions you can do consecutively. Goal to achieve: 3 - 5 consecutive negatives of at least 3" duration.

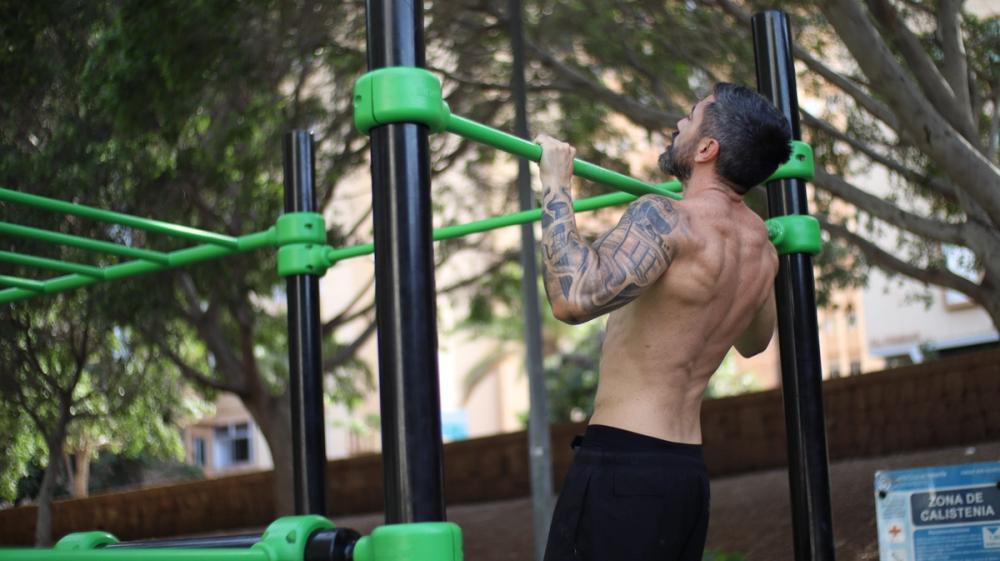
Once you become fluent in the exercises we have described so far and have met the set goals, it is time to make your first attempts at a full supine pull-up (chin-up). Start completely hanging and pull with force. The first movement is a scapular retraction that you have already mastered, which will give you momentum to continue with the rest of the repetition, for which you have prepared by training in different ranges.

Once you can do your first supine pull-ups, you can repeat the entire process mentioned above with all the progressions but in a prone grip. Now they will be much easier for you and you will progress faster, as you have a fairly good strength base, so you can advance without problems until you achieve the prone pull-up. Meanwhile, continue getting more repetitions of supine pull-ups and working on the progressions.
To achieve your first pull-up, we recommend training it between 1 and 3 times a week, depending on how much priority you want to give to this goal. Some people will want to focus all their efforts on the pull-up and, therefore, will train it several times a week. Others will want to combine it with other goals or also train the rest of the body and, therefore, will train it fewer days.
Regarding the routine itself, we recommend choosing the progressions in order, starting with those you can do at your initial level (even if that implies you can only do the first progression).
Place them in order from most difficult to easiest and perform between 3 and 4 sets of these exercises with a number of repetitions that takes you to 80 - 90% of your capacity. For example, for a person who can only do up to short partial repetitions in a supine grip, their routine would look like this (the number of repetitions is indicative):
Use intermediate rest times of between 1 and 2 minutes and, in case you are very close to your capacity limit, extend them up to 3'. As the weeks go by and you perform the routines successfully, gradually increase the number of repetitions until reaching the recommended goals. When this happens, replace the easiest exercise with the next one on the progression list so that you keep moving forward.
If you want an automated routine that follows this scheme easily with our app, we recommend our EVO routine "Back and Biceps Muscle Building," which will have you follow this entire process automatically.
Pull-up training with elastic bands or gym machines that help you up can be a complement to your training, but it should never be the main part of it. Focus on bodyweight progressions which, as we have seen, exist for all levels; if you use bands or machines, let it be occasionally and for supplementation.
Many people think that if they cannot hang from a bar and carry their own weight, they have no way to train pull-ups, or that they must resort to elastic bands or assisted machines. But, as we have seen, there are progressions with feet supported on the floor that do not require you to handle your full weight, and they will help you build the necessary strength to do so.
Normally, many people focus on the prone grip, which is the most typical in pull-ups. But, as we have seen, the supine grip tends to be easier and is more appropriate for advancing through the progressions. In this way, for example, you can work on Australian pull-ups in a prone grip and pull-up progressions on a high bar with a supine grip. And, when you can already do supine pull-ups (chin-ups), you can begin with the prone grip progressions.
This will depend on several factors, the most important being:
As a general approximation, we can say that for a level 0 beginner, we would normally be talking about between 2 and 4 months. Meanwhile, for someone who already has a certain previous base, between 4 and 8 weeks.
Yes, you only need a bar and, for beginners starting from level 0, a low bar would be convenient.
Elastic bands can be used as a complement, but we do not recommend them as the main part of training. Therefore, it is not necessary for you to have elastic bands.
It depends on how high of a priority the goal is for you. If you want to focus all your efforts on improving pull-ups as soon as possible, you can train them 3 times a week. If you have other goals, once or twice will serve to have adequate progress.
In our Calisteniapp application, you have a training program called "Your First Pull-up" with which you can carry out the entire process explained in this video in a guided, structured, and supported manner. Download it now and take a look!
By Yerai Alonso
Personalized quiz
Answer 7 quick questions and we will recommend the program that fits you best.

Yerai Alonso
Cofundador de Calisteniapp, referente en calistenia y el street workout en Español. Con más de una década de experiencia, es creador de uno de los canales de YouTube más influyentes del sector. Autor del libro La calle es tu gimnasio, campeón de Canarias y jurado en competiciones nacionales e internacionales.
Join our newsletter
Learn everything you need to know about calisthenics
Discover what a calorie deficit is, how to calculate it based on your activity level, and how to apply it if you train calisthenics to lose fat without losing muscle.
Learn how to do the human flag step by step. Muscles involved, progressions from scratch, common mistakes, and a routine to achieve it.
We define what strict reps in calisthenics are, why they matter, and how to apply them to every exercise.