What Equipment Should a Calisthenics Park Have
Discover what equipment a calisthenics park should have: bars, structures, stations, and key elements to train correctly.

The Front Lever is a static element that involves holding the body completely straight and horizontal while suspended from a bar. Although many associate it solely with abdominal strength, the Front Lever requires a very precise combination of pulling strength, technique, and body control, making it one of the most challenging exercises in bodyweight training.
In this complete guide to the Front Lever, you will learn what it is, how to execute the correct technique, which muscles are actually involved, which progressions are most effective, the full range of exercises you can add to your routines, and the most common training mistakes.
The Front Lever is an exercise (or static element) in calisthenics and artistic gymnastics. It consists of holding the body suspended in the air in a completely straight and horizontal line, using the hands as the sole point of support.

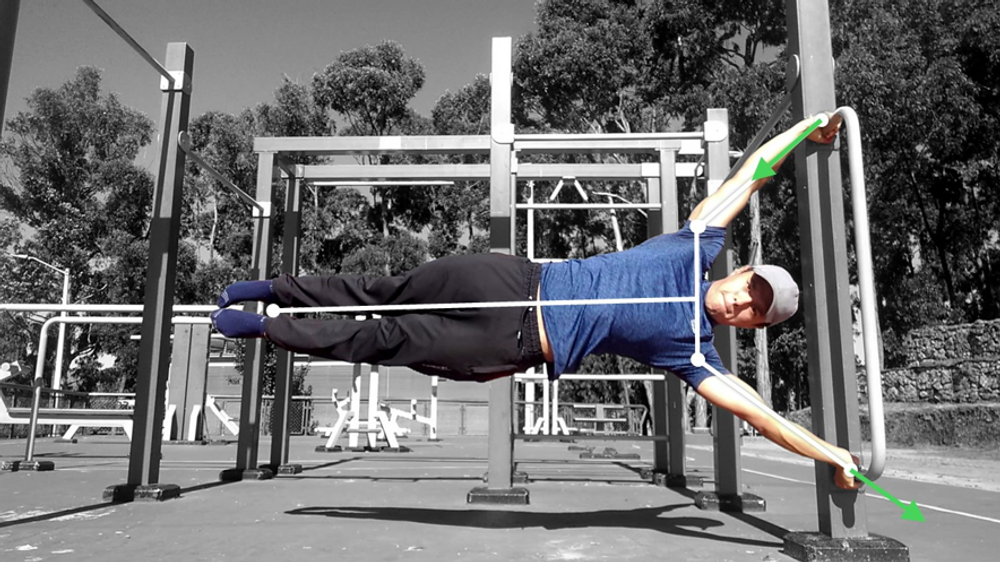
Let's start with the grip. There isn't necessarily a right or wrong grip; however, I recommend using a semi-false grip, which involves slightly flexing the wrist so it sits at a higher position. This allows us to apply more force, making the exercise easier.

Regarding the elbows, they must be completely extended. However, it is normal to perform it with a very slight elbow flexion at the beginning. Just keep in mind that if you want to perform the Front Lever with perfect posture, you must focus on improving this aspect over time.

Next, we have a point of debate: scapular position. To keep this from being too long and complex, focus solely on depressing and retracting the scapulae—meaning, pull them down and back. But beware: do not confuse muscular action with joint position. Let me explain: just because you apply retraction force doesn't mean the scapulae should be as close together as possible, as this could even be counterproductive. Retract the scapulae, but aim for a more neutral position.

Finally, the entire body must be perfectly aligned from shoulders to feet. Therefore, you must keep the spine and hips in a neutral position; they should not be flexed or extended. You must perform a posterior pelvic tilt, squeezing your abs and glutes hard. To complete the alignment, knees should be fully extended and feet pointed. While the latter is not mandatory, it is a more aesthetic detail.

In this section, we will look at all the musculature involved, as the Front Lever is not just about abdominal strength as many believe. To do this, we will review all the muscles, joint by joint, and by the end, you will know which muscles are the most important and which are secondary.
• Fingers and Wrists: This element requires good grip strength and, depending on the case, a semi-false grip; that is, finger flexion and wrist flexion. The muscles responsible for these actions are the hand muscles and wrist flexors—basically the entire anterior compartment of the forearm.
• Elbow: To keep the arms completely straight, you must maintain elbow extension. The muscle responsible for this is the triceps brachii.
• Shoulder: In the Front Lever, the body tries to go up and the arms down; this movement is called shoulder extension. The muscles responsible for this action (specifically at an angle of approximately 40-50°) are the latissimus dorsi and teres major, although other muscles assist, such as the posterior deltoid, teres minor, and even the long head of the triceps.
• Scapulae: Due to body weight, the scapulae tend to go forward and rotate upward. Therefore, the scapular muscles must fight these movements by performing retraction and downward rotation of the scapulae. These muscles are the rhomboids and the middle fibers of the trapezius.
• Spine: Again, due to body weight, the spine tends to extend. Therefore, there must be spinal flexion toward a neutral position and a posterior pelvic tilt to keep the body in a straight line parallel to the ground. The muscles in charge of these movements are the rectus abdominis along with the internal and external obliques.
• Hip: Similarly, there must be hip flexion to maintain the position. Some of the most important hip flexors are the psoas major, iliacus, and rectus femoris.
• Knee and Ankles: To keep the body straight, the knees must be fully extended. The muscle responsible for knee extension is the quadriceps femoris. Finally, although not mandatory, the feet should be pointed. This movement, known as plantar flexion, is performed by the triceps surae (gastrocnemius and soleus).

As mentioned, while the abdominal muscles are involved, they are not the most important. The muscles that must apply the most force to maintain the position are those closest to the shoulder, such as the lats and teres major (shoulder extensors). The further a muscle is from the shoulder, the less force it has to apply, as is the case with the quads and calves.

Before looking at progressions and exercises, you first need to know if you are ready to train it. The Front Lever is an intermediate-advanced exercise, so you need a good baseline of strength and body awareness. Personally, I believe the only minimum requirement you should meet to train the Front Lever is being able to perform a Dragon Flag with perfect form and as horizontal as possible. This ensures:
• The body awareness necessary to perform the Front Lever with correct posture.
• A minimum of strength in the lats, teres major, and abs so you can handle the easier progressions without issues.

Here is a complete guide to the Dragon Flag so you can learn and train this exercise correctly: Dragon Flag in Calisthenics: Complete Guide with Exercises.
Progressions are variants that decrease difficulty by changing body posture. These can be used as exercises themselves (e.g., tucked front lever holds). However, they are also a progression system that can be applied to other exercises, such as tucked front lever pull-ups or tucked front lever raises.
This is very important, as there are very useful exercises that are more advanced than a normal front lever. In these cases, it is necessary to reduce the difficulty, and generally, the most efficient way to do so is through progressions. There are different types of progressions. The one I recommend most is the one where the entire body is tucked and, progressively, the hips and knees are extended (tucked → advanced tucked → half → full front lever).

However, other types of progressions also exist:
• Opening the legs (Straddle)
• Extending only one leg
• Combinations of the above

Unless you understand well how these types of progressions work, my recommendation is that you don't overcomplicate things here and use the easiest one to understand: keeping the body tucked and extending hips and knees bilaterally.
After reviewing the progressions, it is worth mentioning that these are just the tip of the iceberg among all the exercises that can be included in a training program. Therefore, I will show you all these exercises organized, as usual, in a complete diagram.

To start, all Front Lever exercises can be organized on a spectrum according to their level of specificity. On the left, we find the most specific exercises; these train the front lever as such. On the right, we have the less specific or accessory exercises; these work the movements and muscles present in the front lever but without training it directly. I want you to keep in mind that each exercise is like a tool with its own function. There are no good or bad exercises, simply exercises for a specific objective and context.
We will start directly with the first category: assisted isometrics. These work the exact position of the front lever using some type of assistance. The most common is the band-assisted front lever.

However, other types of assistance exist, each with its advantages and disadvantages. For example, using a pulley mechanism, the feet-on-wall assisted front lever, or the back-supported front lever (an exercise I explained in the Dragon Flag article).

In the second category, we have unassisted isometrics. These correspond to the progressions (tucked, advanced tucked, half...) discussed in the previous section. In this case, when there is no way to reduce weight while maintaining the exact position, we shorten the lever length through different body postures. That is precisely the function of progressions.
In the third category, we have straight-arm dynamics. These involve shoulder extension with locked elbows. The main exercise is the Full Front Lever Raise, starting from a full hang and ending in an inverted hang ( a 180° movement). This exercise can be divided into two according to the range of motion. On one hand, we have Front Lever Raises, which start hanging and end in the front lever position.

On the other hand, we have the Front Lever to Inverted Hang, which works the other half of the range.

In the fourth category, we have bent-arm dynamics. These involve elbow flexion during shoulder extension. The first exercise is Front Lever Pull-ups, consisting of a horizontal pull in the front lever position.

The second exercise is Ice Cream Makers. These start in the top position of a pull-up and end in the front lever position.

In the front lever pull-up, the body remains horizontal, while in the ice cream maker, the body moves from a vertical to a horizontal line.
In the first category, we have straight-arm shoulder extension exercises. These do not work the front lever position as specifically.
The first is the straight-arm Dragon Flag.

The second is the Dragon Press. This variant is interesting because, due to the shoulder position, the lats lose the ability to apply force, making it great for strengthening the posterior deltoid.

The third exercise is actually a group, including all those that perform straight-arm shoulder extension using bands or pulley pullovers.

In the second category, we have shoulder extension exercises involving elbow flexion; in other words, pulls.
On one hand, we have vertical pulls (pull-ups and variants) and lat pulldowns.

On the other hand, we have horizontal pulls like Australian pull-ups and weighted rows (barbell, dumbbell, or cable).

Finally, we have exercises that work the muscles involved in isolation. We know the front lever is a shoulder extension exercise, but working secondary muscles is useful for two main reasons:
• First, we are only as strong as our weakest link, and sometimes that link is a secondary muscle.
• Second, strength depends largely on muscle size. For hypertrophy, isolation is more efficient.
For example, the posterior deltoid and mid-traps are involved in horizontal abduction. Exercises like dumbbell flies or reverse ring flies work this.

The abdominal muscles are involved in spinal flexion, worked by crunches or reverse crunches. Another important muscle is the triceps for elbow extension, worked by triceps extensions (bodyweight, dumbbell, or pulley).

These exercises are used for specific cases: people who may not be genetically favored or those who already have a high level but want to maximize every aspect to progress to harder variants.

The front lever consists of keeping the body as straight as possible. If your hips drop, you simply lack the pulling strength needed to hold the position, so you compensate by shortening the lever. If this happens, use a band-assisted variant or a progression suited to your level.

It is normal for elbows not to be fully locked when starting, but they shouldn't be excessively bent. To solve this, use an exercise or progression you can hold for 10-20 seconds and focus on full elbow extension.

A common error is using too much kipping in dynamic exercises like raises or ice cream makers, failing to control the descent and using momentum to go back up. Use an easier progression to perform the movement strictly.
It is difficult to answer honestly, as it depends on many variables: anatomy (height, arm/torso length), body composition (fat %, muscle mass), and previous strength levels.
• First, the front lever is not impossible for most; even people with "bad" genetics have achieved it.
• Second, everyone has their own path. As long as you are consistent and patient, there is no need to suffer over what you cannot control.
For an average person, it likely takes between 6 months and 1-2 years.
If you want to see a specific routine based on movement patterns, I recommend this article: Front Lever Routine by Movement Patterns for Beginners and Intermediates.
This depends on your equipment. Ideally, you need a pull-up bar, tall parallettes, or rings. You could try under a table or a home-made bar, but ensure it is safe.
Weighted training can be useful but is not essential. Specific front lever exercises don't require weights, and accessories can be done with bodyweight variants.
Ideally both, prioritizing hold time (isometrics) but complementing it with dynamic repetitions.
Remember you can find exercises, routines, and a full program in Calisteniapp. Download it and start training smart.
By: Alex Belt
Personalized quiz
Answer 7 quick questions and we will recommend the program that fits you best.
Join our newsletter
Learn everything you need to know about calisthenics
Discover what equipment a calisthenics park should have: bars, structures, stations, and key elements to train correctly.
Discover what a calorie deficit is, how to calculate it based on your activity level, and how to apply it if you train calisthenics to lose fat without losing muscle.
Learn how to do the human flag step by step. Muscles involved, progressions from scratch, common mistakes, and a routine to achieve it.