Wrist Exercises for Calisthenics: Mobility and Warm-Up Without Equipment
Discover the best wrist mobility and warm-up exercises for calisthenics. Rotations, progressions, and tips to protect your wrists during handstands and push-ups.
Fix your banana handstand step by step and achieve a straight handstand with better technique, alignment, and body control.
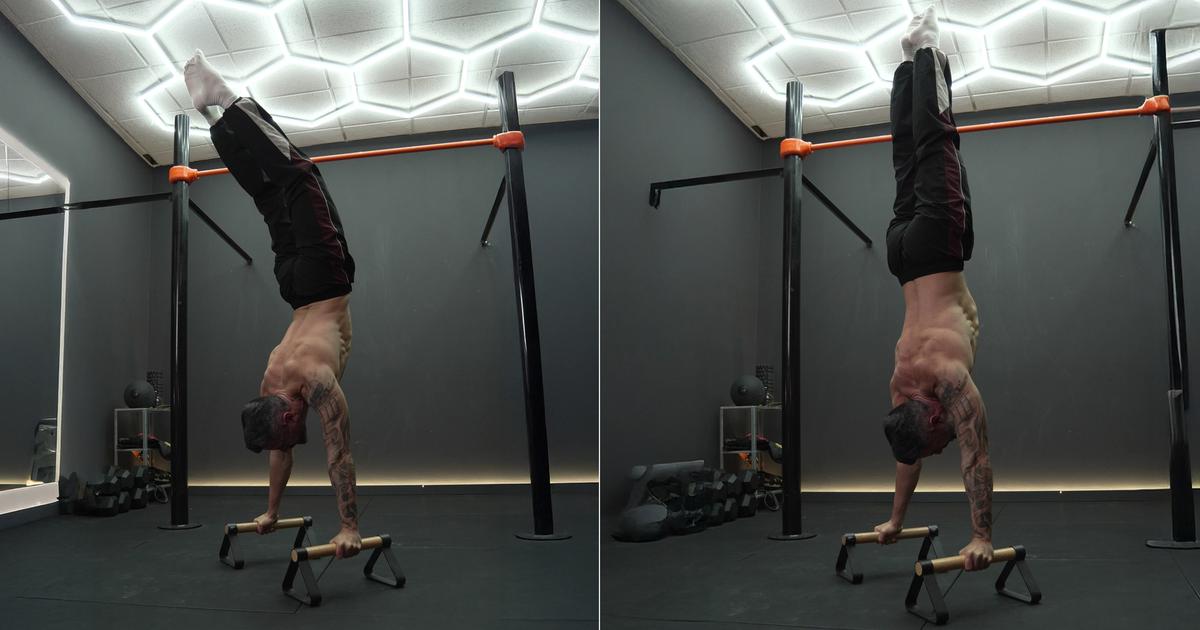
t is normal that, when we are learning to do a handstand, an arched-back technique known as the "banana handstand" appears.
This mistake is very common in beginners and in people who learn the handstand on their own without supervision.
The position is characterized by an exaggerated lumbar arch and is aesthetically considered "ugly," since it looks forced, seems dangerous for the back, and does not align the arms, back, and legs.
Many people wonder how to fix that banana position and achieve a straight handstand. In this article, we will explain in detail why this poor posture happens and how to correct it to achieve a straight handstand.

The banana handstand is characterized by requiring the person, in order to maintain balance, to create an exaggerated lumbar arch, adopting a curved position that resembles the shape of this fruit. Interestingly, the cause of this position does not come directly from the lower back, but is a consequence of poor arm positioning and poor shoulder joint positioning in relation to the torso.
When we perform a handstand and cannot achieve proper shoulder flexion, in which we align the arms with the torso, we have to compensate for that almost diagonal position of the trunk in relation to the arms by creating that lumbar curve so that the legs move backward, the weight is balanced in relation to the floor, and we can stay in the handstand position without falling.

Therefore, to fix the banana handstand, we should not focus so much on flexing the hips to eliminate that lumbar curve, but rather on our shoulder mobility: achieving enough shoulder flexion and getting the arms, back, and the rest of the torso aligned.
This way, to maintain balance, we will need to keep the legs straight and, therefore, that excessive lumbar curve will not occur. If we create the banana position with the arms and torso aligned, we will fall backward and, therefore, we will not be able to maintain balance.

The strict handstand position is mainly based on the arms, back, legs, and tips of the feet being in a perfect line. This implies, as mentioned earlier, a fairly pronounced shoulder flexion, using as a reference that our biceps should be close to our ears.
By having the arms and torso aligned, the balance point forces the legs to be aligned as well, transferring all the weight toward the floor very efficiently. If we have the elbows perfectly locked out, we will notice that the position is quite comfortable and does not require a great amount of muscular effort.

Regarding the hips, it is true that we can maintain a perfect line throughout the whole body without performing a posterior pelvic tilt, which will mean we do not have an exaggerated lumbar curve like in the banana handstand. But the natural lumbar curve of our lower back will still be visible.
That is why the strict straight handstand position is usually considered to include a slight posterior pelvic tilt that eliminates this natural curve of the back and makes the line look even straighter. To activate this posterior pelvic tilt, what we need to do is contract the abs, glutes, and hamstrings, making the hips rotate inward.

Also remember that you need to point your feet so they do not break the line, but instead continue the straight line of the legs.
And regarding the head, it does not need to be completely tucked between the arms. We can keep our gaze toward the floor, but only slightly, without extending the neck excessively. This way, our head will not stick out in relation to our arms, but we will still be able to maintain the reference point by looking toward the floor.
To make it clear, we are going to make a short list of the points to keep in mind that are creating that banana handstand position:
Lack of mobility in shoulder flexion. As we mentioned before, if you do not have enough mobility to perform proper shoulder flexion and bring your biceps to the height of your ear, aligning the arm with the torso, you will not be able to perform the correct straight handstand position. This is easily solved by doing shoulder mobility stretches for a few weeks.
Lack of proprioception in the position of the arms in relation to the torso. Sometimes, even if you have enough shoulder mobility, some people struggle to find this straight position when they are upside down. Therefore, even though they can theoretically do it, sometimes they do not have enough proprioception to align the arms and torso. This is something they need to practice gradually, while in an assisted inverted position against the wall, trying to reach the correct posture.
Lack of strength in the vertical push, which makes you rely too much on the chest. When you do not have enough strength, the handstand position feels very unstable and it is hard to find the straight posture without feeling like you are going to fall or collapse down toward the floor. Therefore, it is very important to have a good foundation of both horizontal and vertical pushing strength, with exercises such as:
Practicing with your back to the wall while being too far away from it. If you practice the handstand with your back to the wall and place yourself very far from it, you will necessarily need to bring your legs to the wall as a support point, arching your back or, in some cases, bending your knees. Be aware of this and place your hands close enough to the wall so you can practice a straight posture without having to arch.
Excessive fear of falling, which prevents us from fully getting into a vertical position. Some people have a small psychological block where they do not feel safe in a vertical position and try to avoid it, either consciously or unconsciously, by placing their trunk very horizontal in relation to the floor. It is key to gradually lose this fear and allow your trunk to become vertical.
We are going to explain the technical steps to follow to fix your banana handstand and turn it into a straight handstand, and it is important that you practice them in these three formats, in the order described below:

This way, you will have more assistance at the beginning and it will be easier for you to focus on correcting the position. Then you will progress in difficulty until you can make these corrections in a free-standing handstand.
The steps are as follows:

Always remember to record your attempts from the side so you can check that you are making the right corrections and achieving the alignment you are looking for.
Passive stretches help you explore a greater range of motion with the help of an external support. Use them calmly, without bouncing and without chasing pain. The sensation should be one of controlled tension.

Place your hands on a low bar, wall bars, or a stable horizontal support. From there, take a few steps back until your torso is inclined toward the floor and let your chest gently drop between your arms. Keep your elbows extended, your head relaxed, and avoid sinking through the lower back. To control the posture better, think about drawing your ribs inward while you hold the position.
The goal is to feel the stretch in the shoulders, lats, and upper back, without losing control of the posture.

Grab a post, column, or stable structure with one hand above your head. Then take a step back or slightly to the side to create tension and let the shoulder gradually move into flexion. Keep the arm straight, breathe slowly, and repeat the same work on the other side.
Do not force the joint. Look for a position where you can breathe and maintain tension without shrugging or rotating the torso excessively.
Active mobility is the part that is often neglected. It is not enough to reach a position with external help: you also need to be able to reach it and hold it using your own strength.

Stand or kneel with your abdomen active and your ribs controlled. Raise your arms forward until you bring them overhead, keeping your elbows straight throughout the entire range of motion. Go up only as far as you can without arching your back, then lower slowly and with control.
The kneeling version usually helps control the pelvis better and avoid compensations through the lower back.

Lie face down with your forehead supported or slightly lifted and extend your arms forward. Activate your abs and glutes to maintain a stable position. From there, raise your arms a few centimeters off the floor without bending the elbows, hold at the top for a moment, and lower with control.
Do not try to lift your arms very high at any cost. Prioritize clean execution: straight arms, relaxed neck, and controlled movement from the shoulders.
Mobility improves with consistency, not with endless sessions. A practical reference:
You can include them at the end of your workout, in a specific mobility session, or as part of your warm-up if you do them at low intensity. Before strength training, prioritize the active versions and avoid passive stretches that are too long.
If you want to follow a more organized guide, you can use Calisteniapp’s Mobility and Flexibility program or include the Mobility and Flexibility EVO routine within your planning. It will help you work on these ranges in a structured way, without depending on isolated exercises or improvising each session
Improving your handstand technique to achieve a completely straight position consists of progressive work in which small details are gradually adjusted until you internalize them and achieve the final form.
It will take some time, but it will be satisfying work, where each small improvement will make your handstand look much more aesthetic and strict.
By Yerai Alonso
Personalized quiz
Answer 7 quick questions and we will recommend the program that fits you best.

Yerai Alonso
Cofundador de Calisteniapp, referente en calistenia y el street workout en Español. Con más de una década de experiencia, es creador de uno de los canales de YouTube más influyentes del sector. Autor del libro La calle es tu gimnasio, campeón de Canarias y jurado en competiciones nacionales e internacionales.
Learn everything you need to know about calisthenics
Discover the best wrist mobility and warm-up exercises for calisthenics. Rotations, progressions, and tips to protect your wrists during handstands and push-ups.
Find out which supplements are worth taking if you train calisthenics (and which aren’t). Creatine, protein, caffeine, and more, backed by scientific evidence.
What's new in Calisteniapp v26.9.0: community comments, a new weighted calisthenics program with RPE, and improvements to the routine builder.