Calorie Deficit: What It Is and How to Calculate It If You Train Calisthenics
Discover what a calorie deficit is, how to calculate it based on your activity level, and how to apply it if you train calisthenics to lose fat without losing muscle.

When people think about push-ups, most automatically think of the chest. However, that idea is incomplete. Push-ups are not an exercise that targets only the pecs: depending on how you perform them, they can also become a very effective tool for training the shoulders, especially the anterior deltoid.
The key is understanding how small technical changes can completely alter the stimulus of the exercise. By adjusting your body angle and the direction of the push, you can turn a chest-dominant movement (horizontal pushing) into a shoulder-focused one (vertical pushing). This principle is essential if you want to build shoulder strength and muscle mass using calisthenics.
In this article, you’ll learn about the best push-up variations for shoulders, from basic options to advanced progressions, along with the correct technique and the most common mistakes. That way, you can apply these exercises efficiently and take your training to the next level.
To understand the role of the shoulder in a regular push-up, we first need to understand how this exercise works.
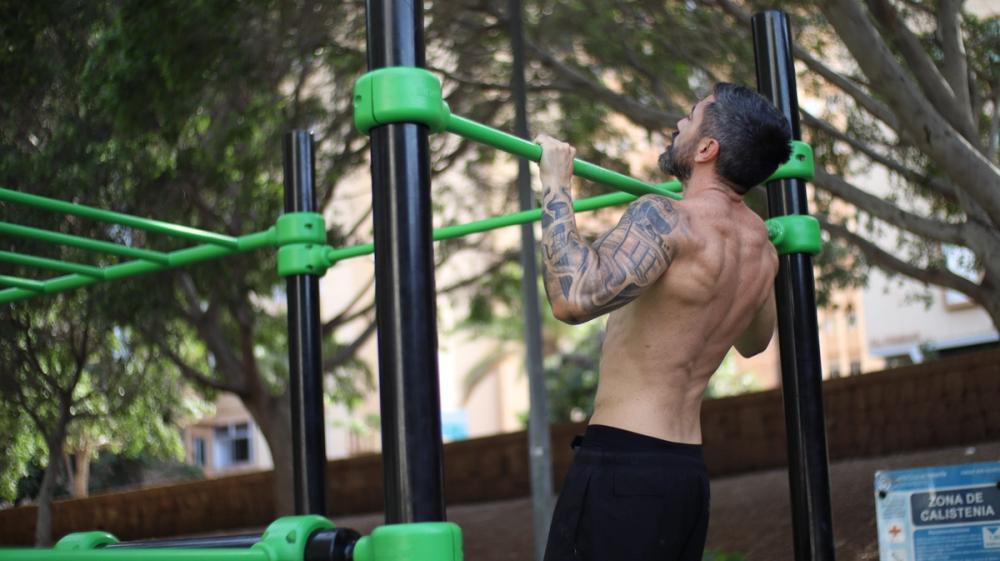
When we do push-ups, we move the arms from out to the sides inward, and from down to up. These movements are called horizontal adduction and shoulder flexion, respectively. The muscles responsible for them are the pectoralis major (chest) and the anterior deltoid (front of the shoulder). So yes, standard push-ups do work the shoulders.
However, most people, especially beginners, perform this exercise with their elbows flared out away from the body. This emphasizes shoulder adduction, where the pecs play the biggest role (1).
One way to shift a bit more of the work to the shoulders is to perform push-ups with the hands placed closer together and keep the elbows as close to the body as possible. This emphasizes shoulder flexion, where the anterior deltoid plays a more important role (2).

Even so, we need to understand that the shoulder produces more force the more elevated the arm is. In push-ups, due to the range of motion and the strength curve, this muscle is still somewhat limited.
To solve this issue, we need to change the direction of the push. Instead of pushing forward (horizontal pushing), we need to push upward (vertical pushing), as in a shoulder press or overhead press.
In calisthenics, when push-ups are done in a vertical direction, we call them vertical push-ups.

The first vertical push-up variation is the Hindu push-up. In this exercise, you set up as if you were going to do a regular push-up, but you push vertically, driving the body back and lifting the hips during the concentric phase.
This is the easiest push-up in this category because you are lifting a relatively low percentage of your body weight compared with the exercises we’ll cover next.
If you want to learn more about this exercise in detail, I recommend the following article: Hindu Push-Ups: The Most Underrated Exercise

The second variation in this category is the pike push-up. In this case, the feet and hands are closer together, so the hips stay higher, forming an inverted V with the body.
Because of this, when you perform the movement, you have to support a greater percentage of your body weight compared with Hindu push-ups.
Later on, you’ll learn everything about pike push-ups: technique, mistakes, progressions, and sample routines.

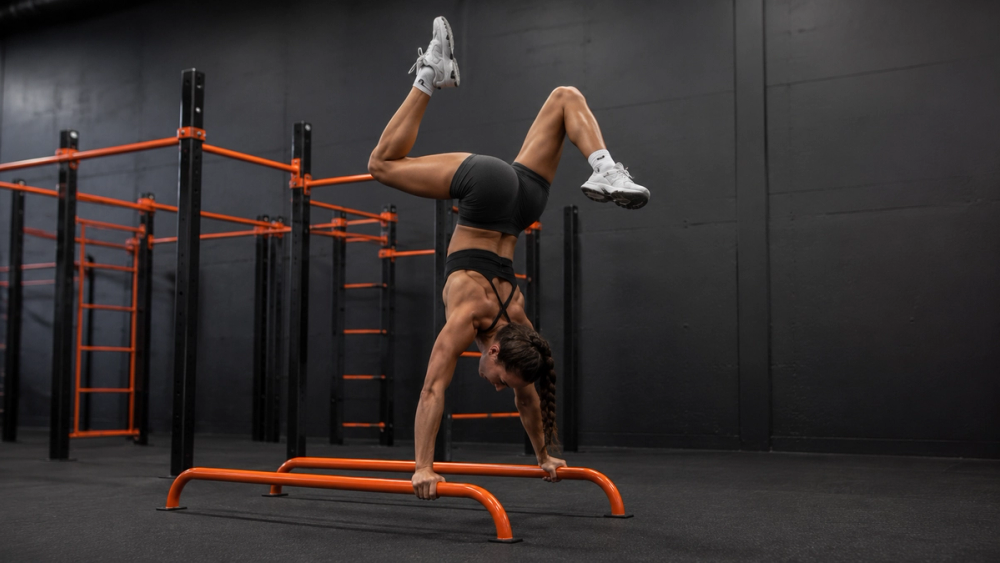
The last variation in this category is the handstand push-up. In this case, the entire body is completely straight. As a result, this is the hardest push-up in this category, since you have to lift nearly all of your body weight.
If you want to learn them, I recommend the following article: How to Do Handstand Push-Ups: A 5-Step Tutorial

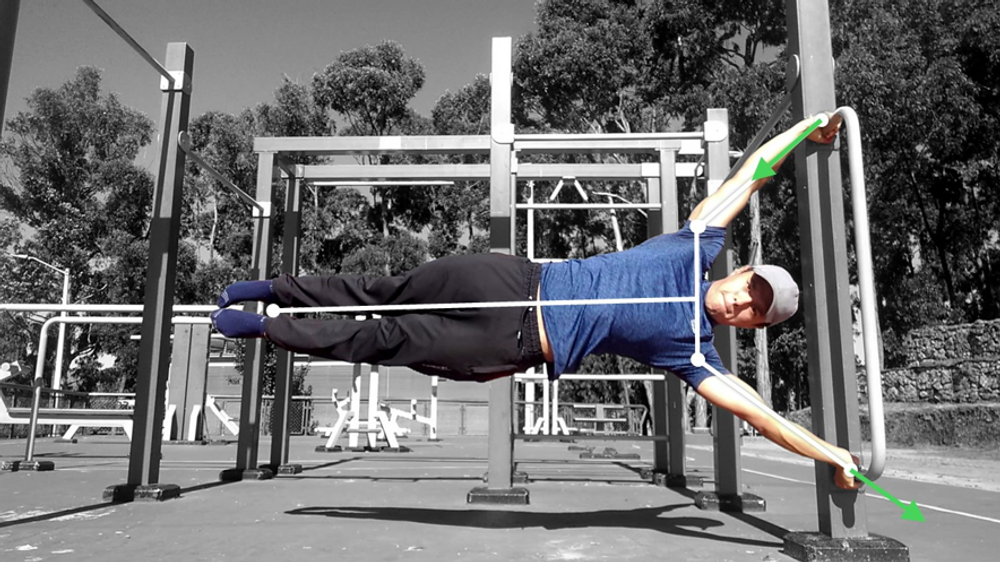
The last exercise we’ll cover is the planche lean push-up. This is a special case because it is not a vertical pushing variation, but a horizontal one. However, I’m mentioning it here because it is often recommended as a shoulder variation.
While it’s true that this push-up places more load on the shoulders, it has the same issue I mentioned earlier. In fact, its range of motion is shorter than that of a regular push-up, and it also puts more stress on the biceps.
Unless your goal is the full planche push-up, I strongly recommend vertical pushing variations instead if you want to train the shoulders as efficiently as possible.
And if you still like planche lean push-ups, I would recommend 90° pike push-ups instead, although I’ll explain that variation in more detail in the progressions section.
First of all, we need to understand that, as with any basic exercise, there are different ways to perform it depending on multiple factors.
So, I’m going to explain the main points to consider when doing pike push-ups. However, most of what you’ll see below also applies to handstand push-ups.
Unlike a standard push-up, pike push-ups are performed with the feet closer to the hands and the hips elevated, forming a kind of inverted V.
The first factor we need to consider is shoulder angle. If we compare it to a bench press, it would be equivalent to the bench incline: the more open the shoulders are, the steeper the angle.
This will depend on your goals and whether you have the necessary shoulder mobility. If your goal is to train the shoulders, ideally you should perform the exercise with the shoulders as open as possible so the movement is fully vertical.
On the other hand, if you don’t open the arms as much, it becomes more like an incline bench press, placing more emphasis on the upper chest.

The second factor to consider is the distance between the hands. This affects two things: the muscles involved and the difficulty of the exercise.
If you perform it with a narrower hand position, the movement becomes more shoulder-flexion dominant, mainly working the anterior deltoid and the clavicular head of the pectoralis major.
If you perform it with a wider hand position, the movement becomes more shoulder-abduction dominant, which means less chest involvement but more work for the lateral deltoid.
However, keep in mind that the difference is not huge. The lateral deltoid has a better leverage advantage during lateral abduction when the shoulder is internally rotated; in pike push-ups, because the shoulder is externally rotated, the anterior deltoid still plays the bigger role (3).

On the other hand, the wider the hand position, the shorter both the range of motion and the shoulder moment arm become, which makes the exercise easier. With a narrower hand position, the opposite happens.
These factors are important not only to understand which muscles you want to target or which variation is easier, but also for the skills you want to develop in the future.
For example, if your goal is to perform many handstand push-up reps, it’s best to train them with a wider hand position. But if your goal is to do a 90° push-up or a tiger bend, you’ll need to train with a narrower hand position.

Note: In the image, the difference is not very large, but in handstand push-ups (especially when also changing body posture), the difference becomes much more noticeable.
Another factor to consider is head position: looking at the floor or looking back. Here, you can do whichever feels more comfortable.
However, if your goal is to progress toward handstand push-ups, it’s more advisable to look at the floor, because this gives you a better position for maintaining balance. It also slightly increases the range of motion.
Now let’s go over some of the mistakes that can show up when performing the exercise.
This mistake is related to elbow position. The issue is not that the elbows are flared; the real problem is poor joint alignment. No matter how wide or narrow your hands are, try to keep the forearms in a vertical line.

Some people, usually because of a lack of strength, first push forward and then back, creating a curved path.
Remember that you should push vertically, bringing the hands above the head and following as straight a path as possible.

Many people make the mistake of bringing the head down to the same level as the hands. When done this way, more of the force is shifted toward the triceps instead of the shoulders.
To fix it, you should bring the head forward so that the forearms stay perpendicular to the floor.

The first method is to bring the feet even closer to the hands. This forces you to lift a greater percentage of your body weight.

Once you’ve mastered that progression, you can increase the difficulty by doing elevated pike push-ups, which involve lifting the feet off the floor during the lower part of the movement.
This is an excellent progression if your goal is a strict press to handstand.

The second method is to elevate the feet. The logic is the same as in the previous case: by raising the feet, you increase the percentage of body weight you have to lift.

The idea is to raise the feet progressively until you reach a handstand position. That way, you’ll be lifting almost 100% of your body weight.

The third method is to increase the range of motion. When you do the exercise on the floor, it’s as if you were only doing half a rep.
To fix that, you can do pike push-ups on a bench or high parallettes so you can lower yourself until your hands are at neck level or even lower.

If you don’t have a bench or parallettes, you can do what I call 90° pike push-ups.
This consists of doing the exercise on the floor and, once your head touches the ground, continuing to lower until your body is completely straight and parallel to the floor.
This is an excellent progression if your goal is the 90° handstand push-up.

The fourth method is to add weight to your pike push-ups, either with a weighted vest or a dip belt.
This is an uncommon progression, but it has two major advantages.
The first is stability. When you do freestanding handstand push-ups, you have to deal with balance, which can be a problem if your goal is to strengthen or hypertrophy the shoulders.
The second is convenience. If you do handstand push-ups facing the wall, getting into position can be uncomfortable: you have to walk up the wall or perform a kind of half-moon entry. With weighted pike push-ups, on the other hand, you can get into position easily and perform the exercise without complications.
The fifth method is to increase instability by doing the exercise on rings.
Besides increasing difficulty, this progression has two other advantages. The first is that, because your hands are not fixed, you can move your shoulders more naturally as needed. The second is that it also allows for a greater range of motion.
However, this progression can be a double-edged sword. If you have a good base of strength and solid technique, it can help prevent injuries because the shoulder stabilizers will be more active and you’ll be able to move the shoulders more naturally.
But if you don’t have enough strength or you haven’t mastered the technique, you could perform a bad rep and get injured. Approach this exercise with caution.

Finally, you can combine different methods to increase the difficulty.
For example, you can increase the range of motion in feet-elevated pike push-ups or in deep handstand push-ups.

You can also add weight, use rings, or even combine both.
That’s one of the beautiful things about calisthenics: we never run out of creativity when it comes to training and progressing.
As you’ve seen throughout this article, there are different techniques and progressions depending on your goals and your context.
Below is a sample routine if your goal is to build shoulder strength and size for handstand push-ups:
If your goal is a strict press to handstand and you’re looking for something more complete, in Calisteniapp you can find two programs focused on that goal:
Yes, regular push-ups do work the shoulders, but they are not the best option if you want to target this muscle. Vertical pushing variations are better suited for that, such as Hindu push-ups, pike push-ups, or handstand push-ups.
Each exercise has its own pros and cons, and the answer depends on your goal and your context.
The overhead press is usually more beginner-friendly because it allows you to use very light loads, the technique is easier to learn, and progression is more precise.
On the other hand, vertical push-up variations don’t require extra equipment, may feel more shoulder-friendly, and are more specific if your goal is to learn advanced movements such as the strict press to handstand or freestanding handstand push-ups.
Yes, especially if you choose variations that allow for a full range of motion, such as Hindu push-ups, deep pike push-ups, or 90° pike push-ups.
If you’re looking for more exercises and routines to train your shoulders, or training programs for advanced movements, you can train with Calisteniapp by downloading it from Google Play or the App Store.
Kuechle et al. (1997). Shoulder muscle moment arms during horizontal flexion and elevation. https://pubmed.ncbi.nlm.nih.gov/9356931/
Hik, F., & Ackland, D. C. (2019). The moment arms of the muscles spanning the glenohumeral joint: a systematic review. https://pubmed.ncbi.nlm.nih.gov/30411350/
Liu et al. (1997). Roles of deltoid and rotator cuff muscles in shoulder elevation. Clinical Biomechanics, 12(1), 32–38.
Personalized quiz
Answer 7 quick questions and we will recommend the program that fits you best.
Join our newsletter
Learn everything you need to know about calisthenics
Discover what a calorie deficit is, how to calculate it based on your activity level, and how to apply it if you train calisthenics to lose fat without losing muscle.
Learn how to do the human flag step by step. Muscles involved, progressions from scratch, common mistakes, and a routine to achieve it.
We define what strict reps in calisthenics are, why they matter, and how to apply them to every exercise.