Calisthenics Supplements: Which Ones Work and Which Are Unnecessary
Find out which supplements are worth taking if you train calisthenics (and which aren’t). Creatine, protein, caffeine, and more, backed by scientific evidence.
Discover the best wrist mobility and warm-up exercises for calisthenics. Rotations, progressions, and tips to protect your wrists during handstands and push-ups.
Our wrists are responsible for supporting practically all of our body weight in a huge variety of calisthenics movements, from basic push-ups to more demanding exercises such as handstands or the different planche progressions.
However, despite the considerable stress they endure day after day, they are often one of the areas we pay the least attention to when warming up or specifically mobilizing our joints. Including proper preparation for this joint will not only help you drastically reduce the risk of discomfort or injury, but will also directly improve your performance and stability in all your pushing exercises.
In this article, we’ll focus on properly working this area with the best wrist exercises for calisthenics, without needing any equipment or gym gear. We’ll cover everything from basic anatomy and the main exercises for improving wrist mobility to progressive loading strategies and a wrist warm-up routine you can use in your next workouts.
The wrist is the joint that connects the hand to the forearm. It is a condyloid joint, which means it allows movement along two axes:

Some people tend to confuse wrist rotation with forearm supination and pronation. However, this rotational movement comes from the forearm, not the wrist.
The muscles that play a role in wrist function—whether by moving or stabilizing the joint—are basically all the muscles of the forearm (except the forearm pronators and supinators) and some of the hand muscles which, together with several forearm muscles, flex and extend the fingers.

Our wrists provide support in many calisthenics exercises. They support our body weight both on the floor (handstands, push-ups, planches...) and on parallel bars (dips, L-sits, leg raises...). This is even more important in balance and stability exercises such as handstands, or on unstable surfaces such as rings.
If you had wrist pain or an injury, your range of exercises would be drastically reduced. This is crucial in calisthenics, since we don’t have the convenience of a traditional gym, where we can use cables and straps to train without loading the wrists. That’s why it’s so important to have good stability in this joint.

On the one hand, the wrist allows us to support ourselves on the floor with our hands flat. Without adequate mobility, you wouldn’t be able to practice floor-based calisthenics and would always depend on parallel bars.
On the other hand, wrist mobility allows us to perform specific calisthenics skills, such as full planche variations, the impossible dip, and any exercise using a false grip. That’s why it’s so important to have good mobility in this joint.

We’ll start with extension mobility, since this is the most common position in most exercises, even in basic progressions.
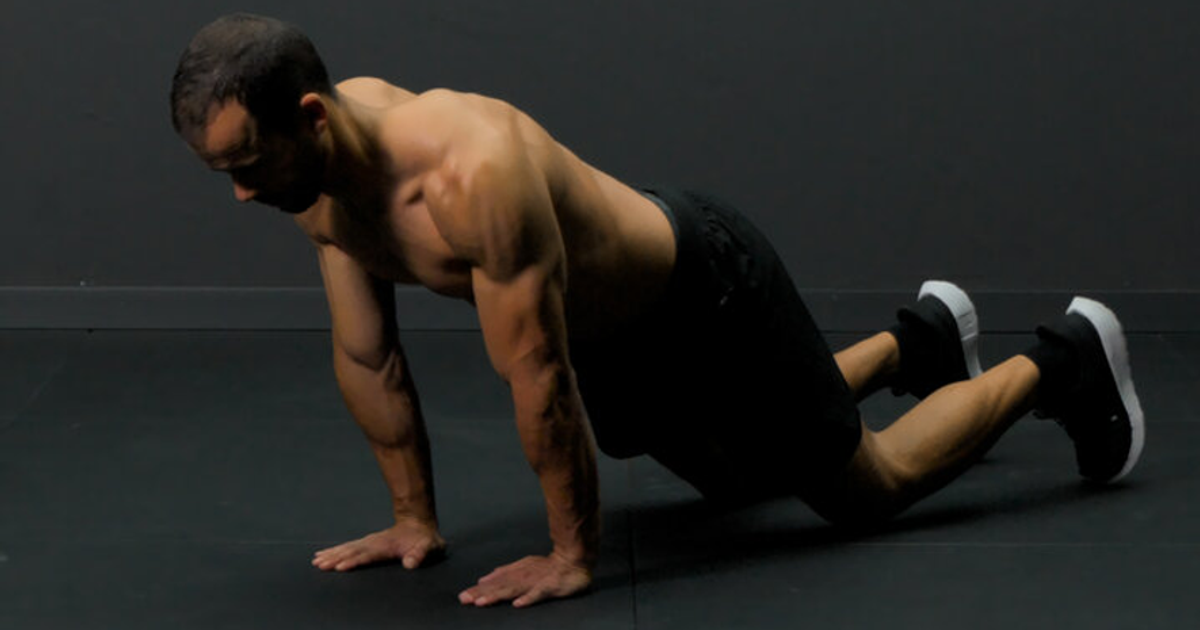
One of the best ways to work on it is from a hands-and-knees position, leaning your body forward to bring your hands into greater extension.

You can perform this exercise for repetitions (like a dynamic stretch, ideal for warming up) or hold the position for several seconds (like a static stretch, for the end of your routine or during dedicated mobility sessions).
At first, it’s best to progress by leaning farther forward to increase your range of motion. Then, you can progress by adding more load to the joint: perform the stretch in a pike position, then with your feet elevated, and finally in a handstand position. These progressions are excellent if your goal is to learn the straight-arm press to handstand.
Generally, you don’t need a great deal of wrist flexion mobility. However, there are exercises in calisthenics and gymnastics that do require it because these disciplines use the false grip.
The false grip places the wrist in a more elevated position, increasing wrist flexion. It is mainly used for exercises on rings, but also for pulling exercises on a bar, such as the muscle-up, front lever (and its variations), pelican curl, and Hefesto.
To improve wrist flexion mobility, you can do the previous stretch, but support yourself on the backs of your hands with your fingers pointing toward your knees. Unlike the previous stretch, we aren’t used to supporting ourselves with our wrists in this position, so be much more careful and move slowly.

To progress, gradually move your knees farther away from your hands; you can even get into a plank position with your hands in that position. But be very careful with this last progression: proceed cautiously and progress slowly.
If this article weren’t focused on calisthenics, I’d say that having good wrist mobility in radial and ulnar deviation isn’t that important. However, in calisthenics there are exercises and skills where good mobility in these two positions is important:

Despite this, I don’t think it’s necessary to do specific stretches for these positions. To start with, these exercises are more advanced, and if you’re going to practice them, you probably already have good wrist mobility. Plus, you can improve your mobility in these positions with specific progressions for those exercises, without having to resort to extra, unnecessary exercises.
Before we begin, I want to clarify that the exercises you’ll see below use only your body weight. There’s already plenty of information on training the forearm muscles with weights, bands, and gym equipment, but very little on how to do it without equipment, at home or at a calisthenics park.
The easiest and most targeted way to work your forearm muscles is by doing forearm presses (or wrist presses).

To do this, get on the floor on all fours, as if you were going to do a wrist extension stretch. From this position, push your fingers into the floor, lifting your wrist. This will work your wrist flexors. Keep in mind that your torso will also lift slightly as you perform the movement. Don’t bend your elbows; otherwise, this will be more of a mobility exercise than a strengthening exercise.
You can also do this exercise with the backs of your hands on the floor to work your wrist extensors. In this case, it’s best to do it with your fists closed. Again, be much more careful with this exercise: your wrist is very likely to collapse toward the floor.

This exercise works the muscles responsible for ulnar deviation. Whether you want to work all your forearm muscles to the fullest or your goal is to achieve the full planche, these muscles are very important for this skill.
For this exercise, it’s best to use parallel bars: you’ll get a better grip, and it will be more comfortable on your wrists. You can hold the planche lean isometrically or do reps, moving your body back and forth.
If you want to learn the full planche, we recommend the Calisteniapp program:
And if you’re just starting out, you can begin with the planche fundamentals program:

If you also want to work the muscles responsible for radial deviation, simply do the same thing with your body facing upward, as in a reverse plank position. These muscles are very important for the impossible dip or the V-sit.
In this case, if your goal is to train your forearms specifically, your body position doesn’t matter as much: you can bend your knees or let your hips sag; the important thing is to face upward and lean back.
If you want to learn the impossible dip, we recommend the Calisteniapp program:

Personally, I think the handstand is one of the most underrated exercises for the forearms. Although some people find handstands child’s play, balancing and holding this position for more than 10 seconds requires significant activation of the forearm muscles.
Also, if you do it on the floor or on a fixed bar, you’ll activate your wrist extensors as well as your wrist and finger flexors. And if you do it on parallel bars, you’ll activate the muscles responsible for radial and ulnar deviation of the wrist.
If you want to learn the freestanding handstand, we recommend the Calisteniapp program:

The false grip works your wrist flexors and can be used for a wide range of exercises, whether on rings or a bar.
If you’ve never trained this grip before, you can use it for Australian pull-ups. You can do them on a bar set at a medium height, but if you can, I recommend using rings so you can adjust your body angle more precisely to match the difficulty level that best suits you.
Once you’ve adapted more to this grip, you can use it for exercises such as pull-ups, ring biceps curls, or pelican curls.
And if you’re at a much more advanced level, you can use it for exercises such as the Hefesto or back lever pull-ups. If that’s you, we recommend the Calisteniapp program:
Lastly, grip strength training works the finger flexor muscles.
I won’t go into much detail because there’s already a full article on the blog dedicated to this topic. I recommend reading it to learn more about grip strength and which specific exercises to do to improve it: Grip Strength: How to Improve It and Do More Pull-Ups
First and most importantly, make sure you use proper technique for every exercise. Many cases of wrist discomfort are caused by poor joint alignment while performing an exercise. This is very common with push-ups and their variations, as many people flare their elbows out too much when pushing, putting a lot of pressure on one side of the wrist. It also happens when you don’t place your hands properly on parallel bars, allowing your wrists to sag inward.
Avoid jumping into advanced exercises or progressions too quickly. Sometimes the problem isn’t the exercise itself, but that your wrists aren’t adapted enough yet. If you’re a beginner, avoid handstands, full planche progressions, or advanced false-grip exercises without proper preparation.
If you haven’t fully adapted to an exercise, it’s best to always warm up before doing it. Avoid attempting an advanced exercise cold and all at once. It’s better to spend 5 to 15 minutes warming up than to endure weeks or months of rehabilitation.
Before recommending a wrist warm-up, I want you to know that the exercises will depend on your goals and what you plan to train afterward. There’s no need to do a super long, complex wrist routine if you’re not actually going to work on those specific movements in your main workout.
Therefore, it’s up to you to choose the specific exercises and stretches that best suit your own routines, as well as the timing and number of reps.
Finally, if you want to follow a specific routine to train your forearms based on your strength level, and learn more exercises for these muscle groups along the way, I recommend reading the following article: Best Calisthenics Forearm Exercises: Build Your Grip and Control
In short, taking care of your wrist health is essential if you want to make consistent progress in calisthenics without interruptions. As we’ve seen throughout this article, developing good mobility, strengthening your forearm muscles with your own body weight, and performing a specific warm-up before each session will help you handle the demands of challenging exercises such as handstands, planche work, or false-grip training, preventing discomfort and optimizing your performance in every workout.
If you want to master exercises such as the handstand, full planche, impossible dip, or Hefesto without injuring your wrists, you’ll find guided routines and step-by-step programs specifically structured for your strength level at Calisteniapp.
Personalized quiz
Answer 7 quick questions and we will recommend the program that fits you best.
Learn everything you need to know about calisthenics
Find out which supplements are worth taking if you train calisthenics (and which aren’t). Creatine, protein, caffeine, and more, backed by scientific evidence.
What's new in Calisteniapp v26.9.0: community comments, a new weighted calisthenics program with RPE, and improvements to the routine builder.
Want to train your lower trapezius? Improve your posture and technique in pull-ups and handstands. No equipment, with progressions